

How To Remove Nailed Down Subfloor
DIY Hardwood Floors: Lay a Contrasting Border
Updated: Sep. 30, 2019
Heady pattern possibilities with prefinished forest laminate flooring

Mix and match colors of woods laminate flooring, add a few rock tiles as accents, and suddenly you've fabricated an extraordinary woods flooring for the same toll as an ordinary one.
You might as well like: TBD
- Time
- Complication
- Cost
- Multiple Days
- Intermediate
- $501-1000
Overview
Woods floors are durable and easy to clean, and they never become out of style. If they garner a few oohs and aahs along the fashion, all the better. Here's a recipe for taking three shades of laminated wood floor and a few granite tiles to create your ain ooh-aah floor featuring two different forest floors side by side.
Even though it looks fancy, this is a relatively straightforward project, particularly if yous've laid a forest laminate floor before. You'll need a table saw to rip the narrow flooring strips, and a miter saw for precise crosscuts. About DIYers can complete a medium-size floor like this in a day. We're not going to encompass all the steps of a normal floor installation (at that place are a couple of articles elsewhere on our Spider web site that can aid you with that). Instead, we'll zero in on the oohaah part.
Figure A: Society of Associates
Cut and install the dissimilar elements of the floor in the order shown here.
Get your materials and get fix
We used natural language-and-groove engineered wood flooring that was 3/8 in. thick and 3 in. wide. Information technology was the perfect fit with our 12-in. granite tile since it was the same thickness, and four of the planks laid side by side were the same width as the tile. This made installing the edge a cinch.
We chose three different shades of floor. Information technology comes in random lengths 5 ft. and shorter. Since yous have to order full boxes, and each box contains about 25 sq. ft. of flooring, you'll probably current of air up with extra fabric, especially the flooring for the accent strips. (If you have a closet that needs new flooring, hither's your chance.) This blazon and thickness of flooring is available in a wide range of styles and prices. But exist sure the flooring you select is designed for gluedown applications. This project won't work with floating floors or cushion-backed laminate floors.
Afterward removing the one-time carpet, we installed a layer of one/4-in. lauan plywood. It covered upwardly the sometime subfloor, which was full of boom holes, glue residuum and grime from previous floorings, and provided a clean, flat, fresh start for our glue-down floor.
In that location are five parts to the floor: field, emphasis strips, border and perimeter, all wood laminate, plus the tiles (see Figure A). You can arrange the size of any of them to fit your room and tastes, but as y'all program, go on these tips in mind.
Field
This is the eye, and largest, part of the floor. It will mimic the shape of your room. The shade of wood for this and the perimeter are the aforementioned, making it the dominant color; select it carefully. If your room is rectangular, you lot can install the planks either the long or the short mode.
Accent strips
These are the floor'southward "racing stripes." Nosotros cutting two 1-1/4-in.- wide accent strips from each 3-in.- wide plank. When you rip them, don't remove the "tongue edge." The natural language will come in handy (Photo 5).
Border
This consists of 4 dark-colored planks sandwiched between the accent strips. Four 3-in. planks installed next are exactly the aforementioned width every bit the tile (12 in.), meaning nosotros didn't take to rip any of the border planks to width. You lot can apply whatever size tile or floor, but you lot may wind upward having to cut either the tile or the flooring to fit.
Perimeter
This is the outer "frame." You want your perimeter to be equal in width on all four sides of the room. We made ours about 17 in. wide; slightly wider than the edge. If your room is slightly out of foursquare, use the perimeter, where it will be least noticeable, to absorb the deviation.
Tile
The sky's the limit here—equally long as the thickness is correct. We found a huge variety of 12-in. tiles in granite, marble and ceramic, all of which had the necessary 3/8-in. thickness. We borrowed sample tiles and laid them out with our wood to option the one nosotros liked.
Photograph 1: Establishing the Layout
Use curt pieces of flooring and 2 tiles to lay out a sample stretch of floor. Your goal is a layout with full-width flooring boards for the field and a border and perimeter of equal width around the room.
Start foursquare and true
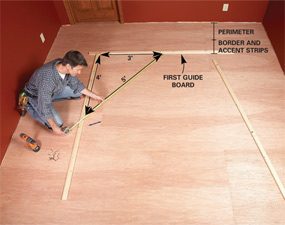
Photo 2: Install guides
Spiral down a straight ane×two guide board, parallel to the wall, to signal the edge of the field. Install ii more than guide boards the same altitude from the walls, perpendicular to the first guide board. (Use the iii-4-five method to foursquare them.) These last boards must exist exactly the same distance apart their entire length.
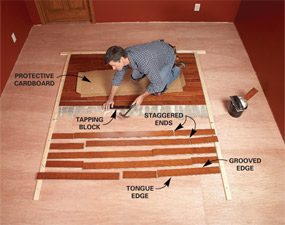
Photograph 3: Glue the field down
Lay the field. Y'all'll probably use two or three boards butted end to stop for each row; stagger the ends of boards at least 6 in. from the previous row. Be exact! Don't force the guide boards outward or leave gaps. Use a tapping block to protect lath edges as you lot install them.
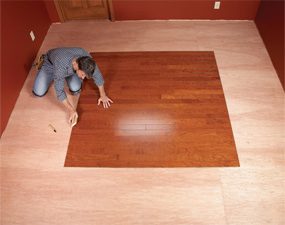
Photo 4: Bevel the ends
Apply 180-dust sandpaper and a block to create a 'micro bevel' along the ends of the boards. This mimics the slight bevel on the factory edges, gets rid of precipitous edges and creates a more than uniform wait. Do this to all the cut ends and edges of every board and accent strip you install.

Close-upwardly
Use a stain pen on the bevel so that it disappears.
Y'all'll need to do a little head scratching to get the layout correct, and the best fashion to scratch is to use the tiles and small pieces of the actual floor you'll be installing. Temporarily lay out small sections of the perimeter, accent strips and border confronting two opposite walls. Then lay downwards short sections of flooring to fill up in the gap or field. Adjust the width of the perimeter then the field consists of total-width planks.
Remove your perimeter, emphasis strip and border sample pieces and screw a guide board to the floor as a starting point for the field (Photo two). Install two boards perpendicular to this to act as width guides for the field. These boards must be exactly parallel and then the entire floor volition exist straight and square.
Utilize a 12-in.-broad swath of flooring adhesive using a notched trowel held 45 degrees to the floor. Spread only as much adhesive as y'all can cover in near xxx minutes. If the mucilage starts skimming over, use the flat border of the trowel to scrape information technology upwards, then apply fresh agglutinative.
Install the field flooring offset at the first guide board, working "tongue out" (Photo 3). Immediately wipe up any agglutinative on the face up of the flooring.
After installing the field, let the glue set, remove the guide boards and and then utilise a sanding block with 180-grit paper to slightly bevel the edges (Photograph 4).
Note: It'south oftentimes easier to run your sanding cake forth the edge or end of the strip or flooring before information technology's installed. Utilise a stain pen to stain this "micro bevel."
Head for the border

Photo 5: Fasten the showtime accent pieces
Install the showtime accent strip perpendicular to the field boards. Use a notched trowel to butter the back of each strip with agglutinative, and then use a few end nails to hold the strips in place. Keep a rag in your back pocket to immediately wipe up any adhesive that gets on the surface.

Photo 6: Fasten the next accent pieces
Ready the 2nd set of accent strips in place, allowing space for the tile and short emphasis strips installed in the next step. Cut and install the strips.

Photo vii: Identify the tiles
Install the short accent strips. The masking tape tabs on the tiles allow y'all to hands remove them so you can permanently adhere them in identify when the project is finished.

Photo 8: Lay the border
Install the four rows of floor planks that create the border. The combined width of these planks needs to be identical to the width of the corner tiles.

Photograph 9: Place the outer accent pieces
Install the outer accent strips, mitering the corners. Install them so the groove 'catches' the natural language of the last full-width edge flooring lath.
Apply a tabular array saw to rip the accent strips. On the strips where you leave the natural language, move the table saw fence out (to recoup for the natural language) then the exposed office of the floor plank is 1-one/iv in. Sand a micro bevel on these cut edges every bit well.
Install the first accent strips tightly against the cut ends of the field (Photo 5). "Butter" the back and use a few terminate nails to secure these strips in identify. When you're washed, make full these holes with wood putty.
Side by side, install the accent strips along the other two edges (Photo 6). These strips should be long enough to accommodate the tiles on the ends plus the short accent strips installed in the next step. Get out the tiles in place, but don't glue them down. Install the four short accent strips (Photo 7) that run along the edge of the tile. Once more "butter" the backs of the strips and hold them in place with a few finish nails.
Install the four dark border boards on each side (Photo 8). For the edge to exist gap-costless, the combined width of these boards needs to be the same width as the tiles. Only since y'all planned way ahead, this will come out perfect, right?
The outer accent strips are last. Miter the corners and install the strips "groove in" so the groove catches the tongue of the outermost edge boards (Photo 9).
Frame your masterpiece

Photo 10: Cease the perimeter
Install the perimeter pieces herringbone-style in the corners. Piece of work in small sections and work your way effectually the room. Rip the outermost perimeter slice to width if necessary, leaving a one/2-in. gap between it and the wall.
Installing the perimeter is your terminal step. The best method is to apply a herringbone design in the corners, which allows you to lock the ends together using the tongues and grooves on the ends of the planks. Install one row of boards around the entire border, then piece of work in small staggered sections effectually the room. Rip the outer lath of the frame to width so there's a 1/2-in. gap between it and the wall (Photo x).
Keep furniture and heavy foot traffic off the floor for 24 hours. Install the baseboard and quarter-round moldings. Press the quarter round tightly to the flooring as y'all install it, to eliminate gaps.
Finally, remove each tile, apply a dewdrop of clear silicone caulk and press information technology firmly back into place. And then invite friends over to ooh and aah a little.
Required Tools for this Project
Have the necessary tools for this DIY project lined up before you get-go—yous'll save time and frustration.
You'll also demand a tapping block for the floor (sold with the floor).
Required Materials for this Projection
Avert last-minute shopping trips by having all your materials ready alee of time. Hither'due south a listing.
Originally Published: September 30, 2019

Source: https://www.familyhandyman.com/project/diy-hardwood-floors-lay-a-contrasting-border/
Posted by: collmanpurvile51.blogspot.com
0 Response to "How To Remove Nailed Down Subfloor"
Post a Comment